


Understanding how people interact with your website is key to improving it. How many visitors are you getting? Where are they coming from? What content do they find most useful? With the right data, you can make smarter decisions that drive real results.
Is Google Analytics Free?
Yes – Google Analytics 4 (GA4) is completely free for most websites. It gives you powerful tools to track visitor behavior, measure performance, and grow your online presence – all without paying a cent. There’s also a premium version, Google Analytics 360, but it’s designed for large enterprises and isn’t necessary for most users.
Now let’s walk through how to set up GA4 on your website:
What You’ll Need
- A Google Account (like your Gmail).
- Access to your website’s backend or a place where you can add custom code.
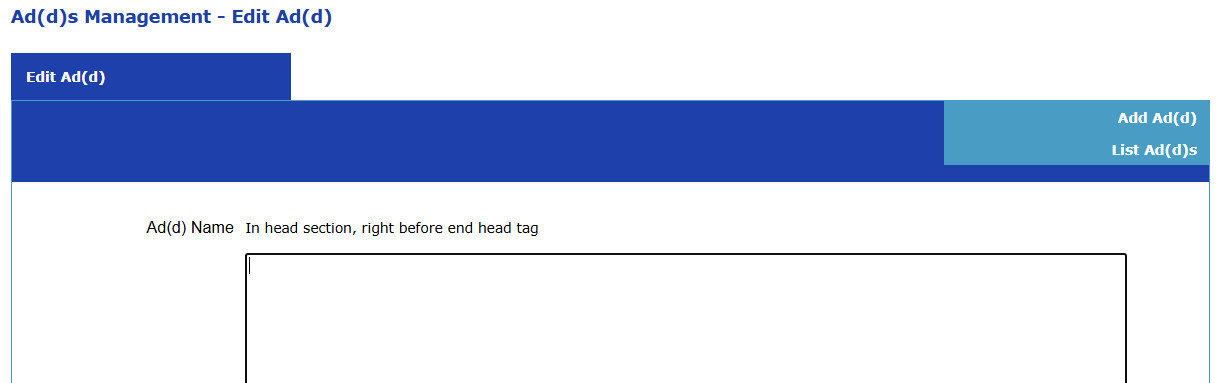
(With the UltimateWB website builder, yuo can use the built-in Ad(d)s app to easily add the Google-provided custom coding.)
Step 1: Create a Google Analytics 4 Property
- Visit Google Analytics and sign in with your Google account.
- If you don’t have an account yet, click Start measuring to create one.
- Create a new Account if prompted – this groups your properties together. Use a clear name, such as your business or website name.
- Click Admin (gear icon in the bottom-left).
- In the Property column, click Create Property.
- Enter a name for your property (e.g., “Your Website GA4”).
- Select your time zone and currency, then click Next.
- Provide optional business info (industry, size, goals) to help Google customize your reports, then click Create.
Step 2: Set Up a Data Stream for Your Website
- After creating your property, you’ll be directed to the Data Streams page.
- Click Web to create a stream for your website.
- Enter your website URL (including https://) and name the stream (like “Main Website Traffic”).
- Leave Enhanced Measurement enabled – it tracks useful interactions like pageviews, scrolls, clicks, and video engagement automatically.
- Click Create stream.
Step 3: Get Your Measurement ID and Google Tag
- Once your stream is created, find your Measurement ID at the top of the stream details – it looks like
G-XXXXXXXXXX. - Click Tagging Instructions to see how to install your tracking code.
- You’ll find the Global Site Tag (gtag.js) code snippet here, which you’ll add to your website.
Step 4: Add the GA4 Tracking Code to Your Website
For Google Analytics 4 (GA4), you should paste the tracking code inside the <head> section of your website.
For UltimateWB Users:
- Log in to your UltimateWB website admin panel.
- Go to the Ad(d)s section.
- Find the Ad(d) marked: “In head section, right before end head tag”.
- Click on the Edit button, and on this page: Paste the full gtag.js snippet
- Save your changes.
For WordPress Users:
- Recommended: Install the official Site Kit by Google plugin or another Google Analytics plugin.
- Simply enter your Measurement ID in the plugin’s settings, and it handles the rest.
- Or, if you prefer manual setup, add the full gtag.js code to your theme’s header.php file just before the closing
</head>tag (using a child theme is best).
For Other Websites (HTML/PHP):
- Copy the gtag.js snippet.
- Paste it inside the
<head>tag on every page, near the top for best performance.
Why paste in the <head>?
- Placing the GA4 Global Site Tag (gtag.js) in the
<head>ensures the tracking code loads early. - This helps GA4 capture important user interactions and pageviews immediately as the page loads.
- It improves accuracy, especially for fast-loading sites or single-page apps where early events matter.
What about before the </body> tag?
- Some scripts are loaded just before
</body>to speed up page rendering or for scripts that aren’t needed immediately. - But GA4 tracking code is best placed in the
<head>because it needs to start tracking as soon as possible.
Step 5: Verify Your GA4 Setup Is Working
- Go to your GA4 property and open the Realtime report.
- Visit your website in a new browser tab and browse a few pages.
- You should see your activity appear in GA4 within seconds.
To double-check, you can also use the Google Tag Assistant Chrome extension, which shows which Google tags are detected on your site.
Step 6: Optional but Recommended Settings
- Link Google Search Console: Connect your GA4 property with Search Console for detailed SEO insights (Admin → Product Links → Search Console).
- Adjust Data Retention: Extend data storage from 2 months to 14 months (Admin → Data Settings → Data Retention).
- Filter Internal Traffic: Exclude visits from your office or home IP to keep your data clean (Admin → Data Streams → Your Web Stream → More Tagging Settings → Define Internal Traffic).
Setting up Google Analytics 4 gives you valuable insight into your audience and website performance. With GA4 tracking in place, you’re ready to make smarter, data-driven decisions that help your site grow.
If you want help or have questions about GA4 setup, just ask!
Related: Why We Don’t Use Google Analytics on Our Website
Are you ready to design & build your own website? Learn more about UltimateWB! We also offer web design packages if you would like your website designed and built for you.
Got a techy/website question? Whether it’s about UltimateWB or another website builder, web hosting, or other aspects of websites, just send in your question in the “Ask David!” form. We will email you when the answer is posted on the UltimateWB “Ask David!” section.